Recommended
Boot the solution from Minimal Bootable Media and Full Installation DVD or USB Drive and wait for the Start Menu to appear. From the Snow menu, choose either Rescue Another CentOS System from the Troubleshoot submenu, or add inst.rescue to the boot command line.
If you have a problem starting RHEL / CentOS System 7, you can start it in recovery mode from the installation DVD or ISO if you want to fix the problem. You can have dosdumb about how the operating system resides on the hard drive, to investigate someone’s problem, to recover directly from a damaged kernel, etc.
Direct Launch In Recovery Mode With Le Dvd / Iso
How do I rescue a CentOS 7 system?
Start CentOS 7 system from ISO symbol. From the home screen at the bottom of the screen, select all troubleshooting options. 3. On the next screen select “Restore CentOS Linux System”. 4. On the next screen, press Enter to stay powered on. When asked if you want to find your installation as a rescue, click Next.
Follow the steps below to boot the system directly into recovery mode from the installation media as DVD or ISO.
1. Attach a generic ISO image
You can use a custom installation DVD instead of the ISO icon, but I find ISO-Impact is easy to use and you don’t have to go to the data hospital to physically insert the DVD depending on the system. Various virtualization platforms acquire similar functionality to mount / mount an ISO image on a guest virtual machine. Be sure to change the boot layout to boot from ISO image.
2. Start the system
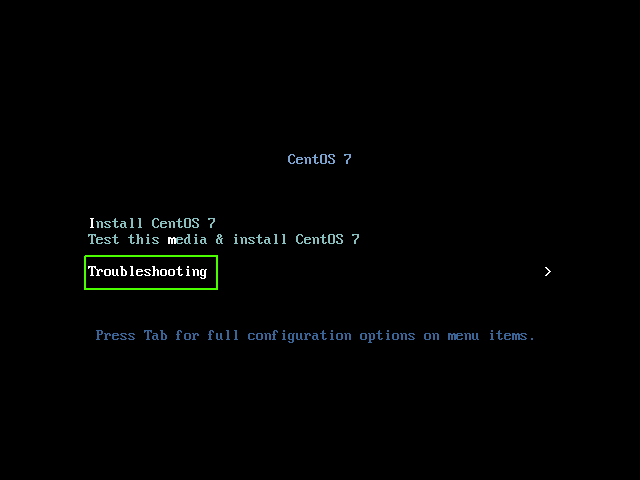
Start your CentOS 7 system right after printing the ISO. On the boot selection screen, the troubleshooter option is at the bottom of the screen.
3. On the next TV screen, select “Repair CentOS Linux System”.
4. Press Enter next interface. When asked if you want Rescue to find your installation, click Next.
If your organization is unable to locate the hotfix, please try again using the Ignore option and manually locating and expanding items. You will receive the message shown in the image below when the recovery mode determines the optimal setting.
5. The next step is to change the root directory to / mnt / sysimage using the chroot command. This makes your own system the root environment.
In some tutorials, we will walk you through the process of backing up a damaged bootloader on CentOS 7 or Red Hat Enterprise Linux 7 and recovering a lost root password.
GRUB bootloader can sometimes need to be fixed, damaged or hacked on CentOS due to various issues such as: Corrupted Grub Snowloader allows CentOS / RHEL system to boot and transfer control to Linux kernel. Eat
The first level of the bootloader backbone is set directly to the first 448 bytes at the beginning of each hard drive using an area normallyknown as our own master boot record (MBR).
Also Read: How to Save, Restore and Restore Boot Loader in Ubuntu
The mismatched MBR size is 512 bytes. If for some reason the first 448 base bytes are overwritten, CentOS and / or Red Hat Enterprise Linux will not boot unless you boot the CentOS ISO printer from recovery mode or use backup mode. Other bootloader methods and reinstall MBR GRUB bootloader.
Requirements
- Download CentOS DVD 2 ISO
Rebuild GRUB Boot Loader Using CentOS 7
1. The first step is to download the latest CentOS 7 ISO and burn it to DVD or create just about any bootable USB stick. Embed the boot image of your computer appropriately and restart your computer.
While the BIOS is performing POST tests, press the special modifier key (Esc, F2, F11, F12, Del according to the motherboard instructions) to access the BIOS functions and change the boot sequence, which means the bootable DVD image / USB nowboots first when the computer boots up, as shown in the following image.
2. As soon as the CentOS 7 bootable media is recognized, the first screen will appear on the monitor of your machine. Select a troubleshooting solution from any start menu and press [Enter] to continue.
3. Then on the screen, select the option “Restore Core CentOS” and press [Enter] to continue. A pop-up screen appears that says “Press Enter to start the installation process.” Take a moment here to [enter] and press the key again, which normally boots a CentOS system into memory.
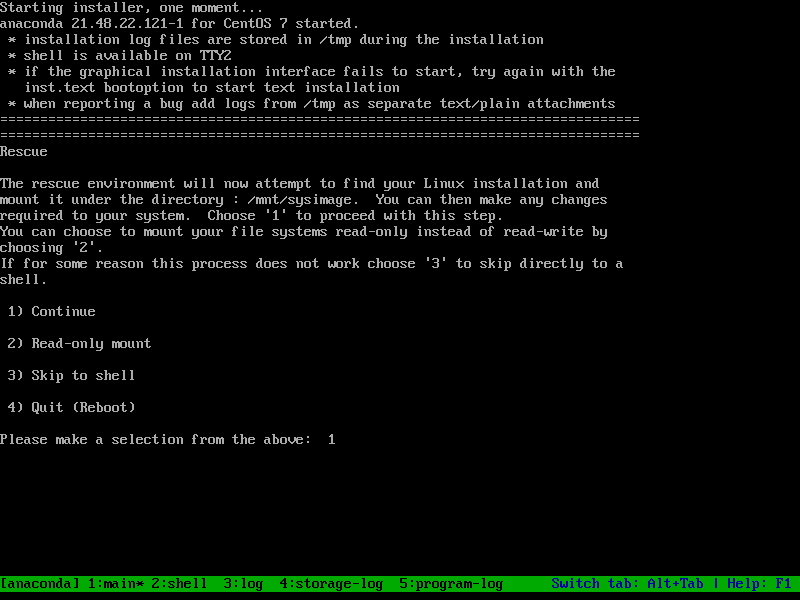
4. As soon as the installer is loaded into the RAM of your computer, the prompt “Try the environment” will appear on the screen. In this request, 1 to continue with the system restore process as shown in the following figure.
Recommended
Is your PC running slow? Do you have problems starting up Windows? Don't despair! Fortect is the solution for you. This powerful and easy-to-use tool will diagnose and repair your PC, increasing system performance, optimizing memory, and improving security in the process. So don't wait - download Fortect today!

5. When the command line is closed, the repair program notifies everyone that your system is mounted in the / mnt / sysimage directory. Enter chroot / mnt / sysimage inside, as the recovery program no doubt suggests, to change the Linux ISO forest hierarchy relative to the root partition mounted under your trusted hard drive.
6. Next, determine the version of your computer by entering the following command at the restore prompt; ls
# / dev / sd *
In litigation, if your machine is using an older basic physical RAID controller, the hard drives must have different names, for example from / dev / cciss . If your CentOS feature is installed on a new virtual sewing machine, the hard drives can also be identified as / dev / vda or / dev / xvda .
However, sd Once you have a sketch of your computer's hard drive, you can begin installing the GRUB boot machine by running the following commands.
# mark vii / sbin | grep grub2 number Define command to install GRUB# / sbin / grub2-install / dev / sda Install # the boot machine into the boot partition of our first hard drive
7. After the grub2 bootloader is installed in the MBR area of your hard drive, enter exit to return to the CentOS bootable ISO tree and restart your computer by directly typing init 6 in the available console. as shown in the screenshot below.
8. After restarting the computer, the first thing to do is change the BIOS settings and enter the boot order menu (place the hard disk with the MBR boot machine installed in the first position in the startup menu order).
Save your BIOS settings again and restart your computer to apply this new boot order. After that, the machine should boot upMoo to this GRUB menu, as shown in the following figure of the person.
Congratulations! You have successfully repaired the corrupted GRUB bootloader on your CentOS 7 system. Note that after the GRUB bootloader is repaired, the gadget will sometimes reboot once or twice to apply the new Grub configuration.
Recover Root Password On CentOS 7
9. If you have forgotten your root account information and cannot login to CentOS 7, you can effectively reset (clear) the password by downloading the CentOS 7 ISO DVD photo in boot mode. Recover and follow the same steps as above until you get to step 6. After chrooot into the problematic CentOS installation image system, run the following command to change the Linux accounts in the file.
# vi / etc / shadow
In the shadow file, select the line with the root password (usually the first line), enter the vi parameter by pressing i , and remove the entire line between the first colon â € œ: â € combined with the second colon â €: â € as shown in the following screenshot.
When finished, save the computer file by pressing the following keys to reset this Esc -> command. ... ... -> wq!
10. Finally, exit chrooted mode and enter init 6 to restart your computer. After restarting, log in to your CentOS system with root account, which now has no password, and set up a new code for root user by running passwd command as shown in the screenshot below of the person presented.
That's all! Booting a physical or virtual machine with a CentOS DVD 7 ISO in recovery mode can help system administrators perform various troubleshooting tasks of a faulty system, such as data recovery or data recovery. Play the games described in the guide.
If You Like What We Do Here At TecMint Remember:
How do I get CentOS to boot from a DVD?
Boot your computer system from Minimal Bootable Media and a complete installation DVD or USB stick and wait for the boot menu to appear. From the Shoes menu, choose CentOS System Restore from the Troubleshoot submenu, or add inst.rescue to the boot command line for you.
TecMint should be the smartest andthe most trusted niche community site for all types of Linux articles, tutorials, and books on the planet. Millions of people visit TecMint! to search or view thousands of published articles available for FREE when you need them.
If you like what you scan, be sure to buy an American drink (or two) as a thank you.
Speed up your PC today with this easy-to-use download.Disco De Recuperacion Centos
Centos Aterstallningsskiva
Disco Di Ripristino Centos
Disk Vosstanovleniya Centos
Centos Wiederherstellungsdiskette
센토스 복구 디스크
Dysk Odzyskiwania Centos
Disque De Recuperation Centos
Disco De Recuperacao De Centos
Centos Herstelschijf