If you receive the error message “Recovering from bad BIOS firmware”, this article is intended to help you.
Recommended
Install the BIOS update boot disk you created recently to perform the original hard update in drive A: then reboot the system.When the floppy drive indicator turns off and the PC speaker beeps (twice in most cases), the recovery should be complete.
An interruption in the effect or an error during blinking will also cause the update to fail and you will not be able to boot this type of computer. Don’t feel like it might not work for you.
The following is taken from the ASUS P5B Deluxe Bios Recovery Flash spi cable, but reproduced here for wiki purposes:
ATTENTION! Never use ASUS utility to flash BIOS for Windows. There were countless people with the same obstacle, if only I knew that the hand was looking at me.
At one point, which could be associated with great stupidity and laziness, I reflashed the BIOS of my ASUS P5B Deluxe using the ASUS Windows Total Flash utility. It has been cleared, a new one has loaded and cannot be verified at this time. In this situation, you only have two options: stop working or try again. So I try again, I don’t even try to collect the BIOS. With no other choice, I rebooted my computer and expected better. I often have the worst.
The machine does nothing at all. The motherboard is said to have a built-in BIOS recovery process, but it also seems to be easily erased by some Windows Flash utilities. When it came time to send it back to ASUS, they could and reflash it again. The BIOS is definitely removable, so there are definitely several types of devices that they plug into to reprogram for you, I thought.
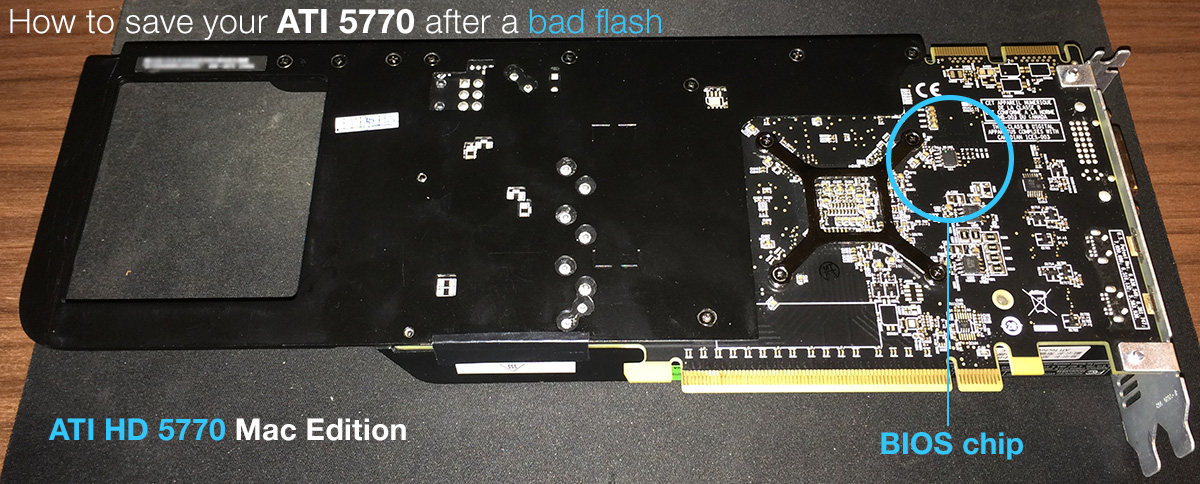
It turned out I was right. Next to the BIOS memory chip, to the left of the Florida bridge, is an undocumented 7-code socket labeled SPI_J1. After some really good research, I came across several pages (links below) that describe the type of cable required to use this port and the BIOS flashing software.
Transmission consists of a parallel port to something with a positive wire that you can connect to become pins that also have an actual 2.7-3.6V input for ICs when flashing to supply power. I made your own really unsuccessful attempt at making a hacked parallel cable and all the ends of the USB plug. It didn’t completely work out, so I found a parallel connector with a ribbon cable in an electronics store. I took it apart and soldered the tape to the correct pins.
To get ~ 3 V, I took the connector power from a long forgotten fan in the case and added diodes to the 5V cable, which is just over 3V. Perhaps I hooked this up to a ribbon satellite and plugged the power plug into another running machine. Then I tried to reprogram my laptop and go back to BIOS.
- Bootable DOS CD, USB key, or possibly a floppy disk.
- Motherboard BIOS
- SPIPGM (the program in which it blinks)
- CWSDPMI (DPMI web hosting process required by SPIPGM)
- Multimeter
- Soldering iron
- DB25 Connector
- Something like a connector, you may need 6 pins in total. Make
I used the DB25M TO IDC10 SERIAL connector for this cable. This is really the easiest thing you can get. They look like this:
The header is definitely right on the motherboard, so you can see to the left of the northbridge.
Here is a table where the header shows which pins should be connected to all parallel pins. Pin 1 on its own header is for + 3V.
pen pen parallel pen========================23 many4 6-85 106 9
This is what some of my cables look like (note: it looks like the power cable is connected to the DB25, but it is actually arc welded, it goes to pin 1 of their header)
If you are using a cable TV like mine, open it up and be sure to unsolder the connector bar. Take a paperclip and insert it into the header connector holes to determine which wire to use with the human multimeter for things attached to the DB25. Solder each wire accordingly.
Then you should get a real 5V line from another computer (red wire on Molex connector). We solder three rows of diodes and connect them to the 5v wire. Use a multimeter to make sure the voltage drop is between 2.7 and 3.6 V. Solder it to a good ribbon cable.
Now you are ready to flash, boot your flash computer from DOS bootable media. You need to start cwsdpmi.exe first and then start spipgm. (Note: you have cwsdpmi.exe every time before SPIPGM and you run it.)
spipgm / p p5b-bios.rom
He willinclude the exact total size of the flashrome, enter 1024. aIf SPIPGM reports the chip ID as fffffffh, the entries are invalid. Browse your entire coalition. SPIPGM has several features such as pre-erasing the BIOS. To get a good list, run SPIPGM with no parameters; Credit
Indicate where recognition is expected, no doubt I would never have known about it without these sites.
- http://richard-burke.dyndns.org/wordpress/tag/p5b/
- http://www.fccps.cz/download/adv/frr/spi/msi_spi.html
- http://rayer.g6.cz/elektro/spipgm.htm
It was only when I downloaded spipgm2 and didn’t want to use the / S command instead of the command in / P that I had success here. is to return my giant clipboard to a good, reliable computer.

The experts seem to be claiming that SPIPGM.exe automatically writes a webpage on the SST chips of Asus P5B cards. You should use either the recently compiled spipgm.exe or, even better, the custom spipgm2.exe . You can build any resistor or wireless capacitor, as stretched as you use orange (3V) ATX power supply output replacing the PC.
spipgm2.exe / S xxxxxx.ROM
to build a To-Chip after your company has unlocked it with / U and uninstalled it with / E . This alone worked for me, so I got back in shape and had a great start.
You need to use the / s (slow) button of the software to program it to the SST chip on ASUS P5 series motherboards. Obviously, the / p switch in the original SPIPGM.Does't exe delivers it quite slowly, or one chunk at a time; this is exactly what the SST chip needs for an absolutely successful flashing.
Recommended
Is your PC running slow? Do you have problems starting up Windows? Don't despair! Fortect is the solution for you. This powerful and easy-to-use tool will diagnose and repair your PC, increasing system performance, optimizing memory, and improving security in the process. So don't wait - download Fortect today!

To run the program, I made two floppy disks, one with a bootable Windows 98 SE CD or DVD, and the other with a program like spipgm2 and a BIOS image registry (with a .rom extension).
-
spipgm2 / ito say for sure that the program can read this chipset and the cable should be fine. -
spipgm2 / uto unlock the BIOS. -
spipgm2 / eto remove the BIOS. -
spipgm2 / s p5b.rom, which allows you to flash a new BIOS.

When o And done, I tried to boot a non-working motherboard and it worked!
Speed up your PC today with this easy-to-use download.
What happens if you mess up a BIOS flash?
Any interruption or electromechanical failure during Adobe Flashdrives the update to fail and you won’t have a tendency to start your computer. This cannot happen to you.
Can you recover a bricked BIOS?
The process seems pretty simple: open the laptop, clear all power supplies (including CMOS), find the BIOS chip, connect each of our clips and clip to the CH341A, connect it to your PC, so use one of the software. available for flashing with Creative firmware on MSI website.
What happens if you have the wrong BIOS?
A BIOS update should not be performed when trying to install the wrong version. You will also be able to display a portion of the BIOS screen using F5 or any key at startup to check if you have that BIOS version installed. The last thing you should do is perform a BIOS recovery to revert to an older version if necessary.