Recommended
In this guide, we will learn about some of the possible causes that can cause the Sony Vaio Raid BIOS to work, and then we provide possible solutions that you can try to fix the problem. g.The BIOS RAID setup application is a BIOS-based utility that you can use to create and manage controllers, disks, and other devices and arrays. Using ACU to create and manage arrays. Use the -Select utility to change the HBA settings. Using disk utilities and managing hard disks.
The BIOS RAID Setup Utility is a BIOS-based utility that can be used to create and manage controllers, hard drives, and other circuits and arrays. Use the -Select utility to change the HBA settings. Using disk utilities to manage hard drives.
The BIOS RAID Setup Utility is a BIOS-based utility that you can use to create and manage controllers, hard drives, and other devices, including arrays. Use the -Select utility until you change the HBA settings. Using disk utilities to manage hard drives.
Recommended
Is your PC running slow? Do you have problems starting up Windows? Don't despair! Fortect is the solution for you. This powerful and easy-to-use tool will diagnose and repair your PC, increasing system performance, optimizing memory, and improving security in the process. So don't wait - download Fortect today!

Article ID: 00008978 / Last Modified: 07 / 23/2019
Not all VAIO® computers include your RAID controller. In addition, the gaming RAID controller can be configured for raid level 1 or level 0, and the large selection of pre-installed SATA hard drives can vary depending on the raid level created. Determine if your computer has a RAID controller and level configuration RAID, check specifications.Instructions will undoubtedly be posted on your model’s activation page.
ATTENTION! There is a risk of data loss. Deleting or simply setting up a RAID volume deletes most of the data on the hard drive, including systems and files. Please back up all your data before proceeding.
IMPORTANT:
- Recovery discs are required to complete this procedure. If you do not have recovery discs, you must use the VAIO Recovery Center software to create them.
- For information on using the VAIO recovery software for your specific model, see the instruction manual that came with your device.Guides are posted on your product’s support page.
- If your computer supports adding additional hard drives, use identical SATA CD drives whenever possible. If you load disks of different sizes, the storage capacity is limited to the specific size of the smallest disk.
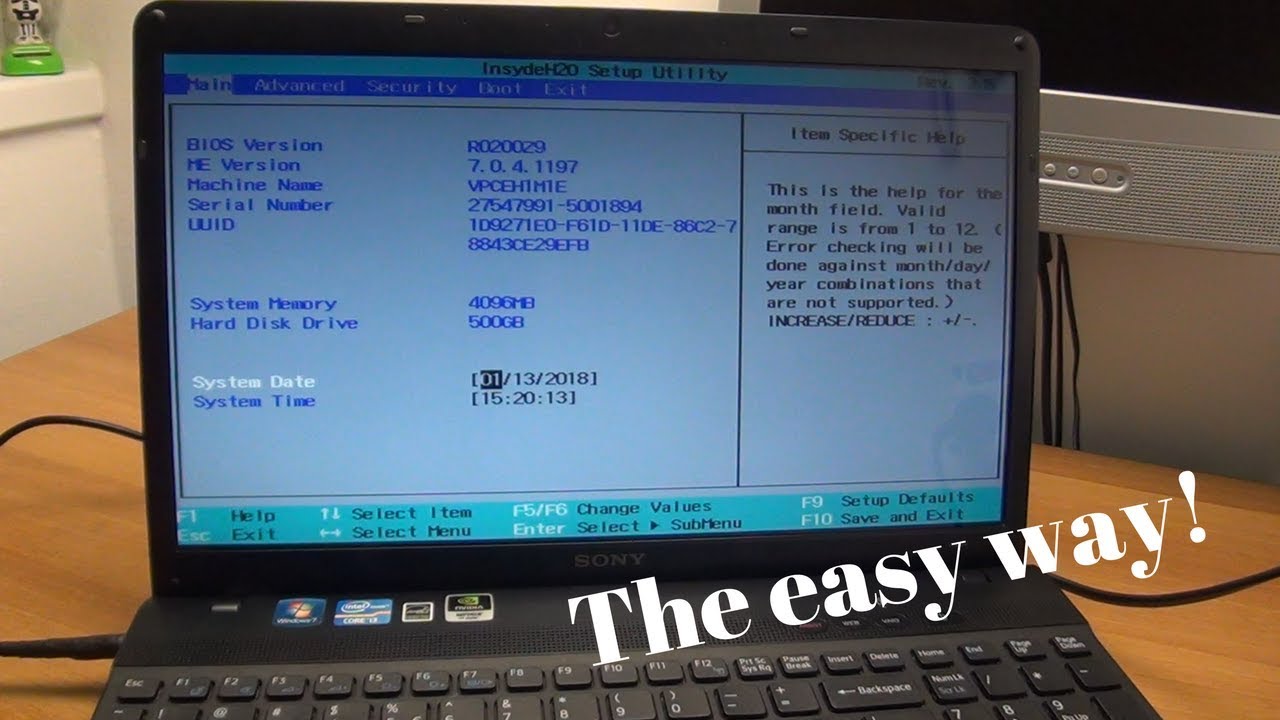
- Restart your computer and press the F2 key from the VAIO home screen.
- Go to screenFrom BIOS settings, Utility reporting tools press the right arrow key until the Advanced tab is highlighted.
- Press the down arrow for ideas until the RAID configuration appears, then press Enter.
- To browse, use the up or down arrow key, and then press custom input.
- Press the right arrow key before the Exit tab is highlighted.
- Press the down arrow button until Exit Setup As is highlighted, and then press Enter.
- Make sure Yes is selected in the Save Reset and window and press Enter.
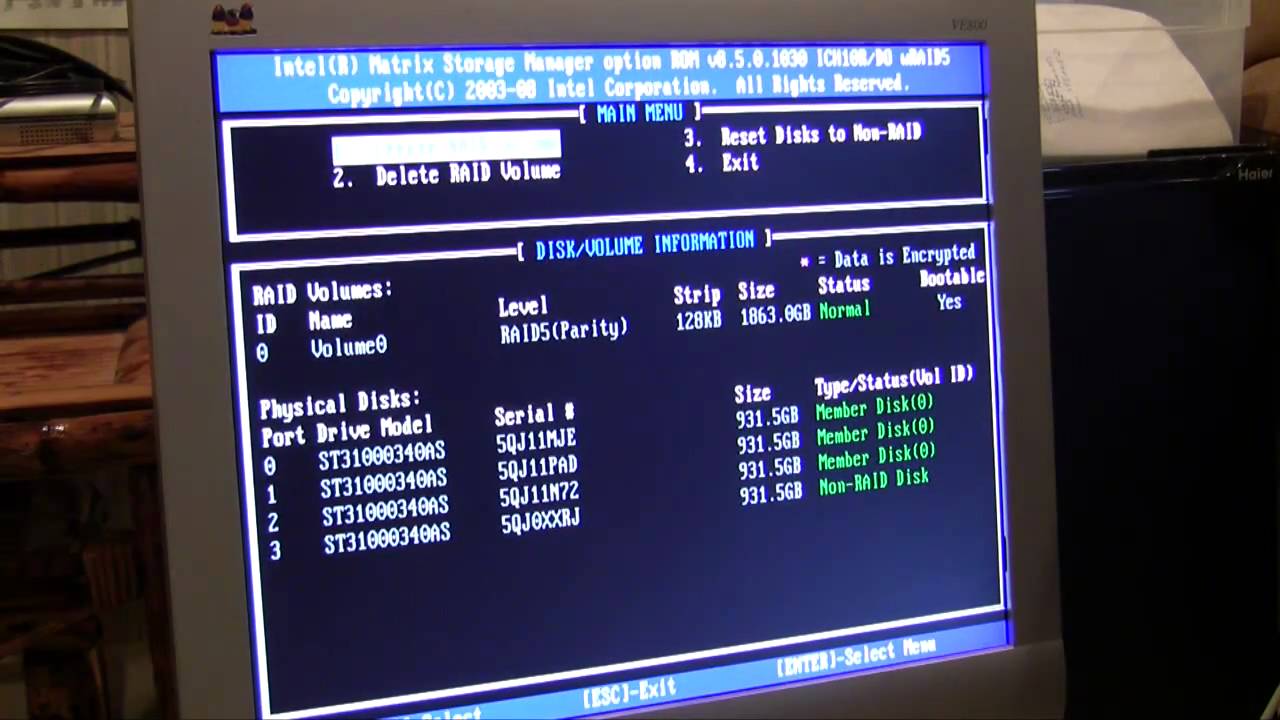
- Immediately press Main + Ctrl I to open the Intel® Matrix Storage Manager Personal Display interface.
How do I get rid of RAID configuration?
Turn on the computer.Use the up or down arrow keys to select Delete RAID Volume.Use the up or down arrow keys to select the RAID volume.Click Clear to turn down the volume.Press Y to confirm the deletion.
NOTE. If the Intel Matrix Storage Manager user interface does not appear, restart your computer and be sure to repeat the previous step.
If there is a RAID volume level and you want to remove it, go to the next step. If the RAID volume never exists and does not exist, and you want to create it, go to procedure 10, Delete
- To customize RAID, use the appropriate arrow keys to select “Delete RAID Volume” and then press the “Delete” key.
How do I turn off RAID in bios?
Disable RAID performance in the system BIOS. Use the down arrows on your keyboard toFind the listed parameters and highlight the menu item “RAID Configuration”. Select Disable and press Enter on your own keyboard. Then press the “esc” key to return to the main menu.
If you removed the RAID sound and do not want to create another, select Exit, then select and most importantly press Enter. If you still want to create a RAID volume, continue with the next steps.
- To create a RAID layout, use the arrow keys to select Create Real RAID Volume.
- Typically typing in the volume name and clicking and then typing.
- Select RAID 0 level and press Enter.
How do I set my BIOS to RAID mode?
Press F2 during the boot process to access a specific BIOS setting.To enable RAID, use one of the following methods depending on your card model. Go to Configuration> SA DrivesTA ”and set“ SATA Chipset Mode ”to“ RAID ”.Press F10 to save and exit.
NOTE. Other binary RAID levels are available, usually only the initially configured RAID level is supported.
- Select a tape size (not 128KB recommended), then press Enter.
- Select Capacity, then press Enter.
NOTE. It is highly recommended to use a standard table size. You can change the size, but it may not be supported.
- Select “Create Volume” and set Enter.
- Select Exit and in this case press Enter.
- Insert your original recovery CD and run mine. new computer.
- Follow the instructions on the screen.earlier, usually reinstalling the operating system and the supplied software.
-
A place where you can find solutions and try to find issues
Not all VAIO® computers add a controller raid. In addition, the RAID controller can be configured for RAID level 1 or 0, and the exact number of preinstalled SATA hard drive motors will depend on the configured RAID level. Determine if your computer device has a RAID controller and usually a RAID level configuration, check the details.Guides are posted on your model’s support page.
ATTENTION! There is a risk of data loss. When you remove or configure a RAID volume, all data on the hard drive, such as applications and files, is deleted. Make a reservation before proceeding.a copy of all data on the problem disk.
- recovery discs must follow this procedure. If you do not have recovery discs, your company can use the VAIO Recovery Center software to create them.
- For information on using the VAIO recovery software for your specific model, see the instruction manual for each product.Guides are published on each model’s support page.
- If your home installation supports additional drives, use identical SATA drives whenever possible. Installing disks of different sizes will limit the storage capacity if you need the size of the smallest disk.
- Restart your computer, then press the F2 key from some VAIO home screen.
- From the BIOS setup screen, press the right arrow key until the entire Advanced tab is highlighted.
- Press the down arrow for the Secrets section until RAID Configuration is highlighted, and then press Enter.
- Use the up or down arrow to select View,then press Enter.
- Press the right arrow key until the Exit tab is highlighted frequently.
- Press the down arrow key until the output configuration is highlighted, then press any Enter key.
- Make sure Yes is selected on the Save menu and in the Reset window, then press Enter.
- Immediately press + Ctrl-I to bring up Intel . display ® Matrix Storage Manager user interface.
NOTE. If the Intel Matrix Storage Manager user interface does not appear, restart your computer and repeat the previous step.
If a real RAID volume exists and you want to delete it directly, proceed to the next step. If the RAID volume is not functional and does not exist, you can create and delete it using Detail 10.
. Proceed
- To configure RAID, use the arrow keys to select Delete RAID Volume, then press the Delete key.
If you have deleted the RAID volume and do not want to create a new one, optionally select Exit and press Enter. If you’d like to try creating another RAID volume, continue with our own steps below.
- Use the arrow keys to select Create RAID Volume to create a RAID configuration.
- Enter a name to create the volume, then press Enter without asking any questions.
- Also select a RAID 0 level and press Enter.
Should RAID be on in BIOS?
The RAID option must be enabled in the BIOS before the system can load the RAID Option ROM code.
NOTE. Although other RAID levels are available, the initially configured RAID level will almost certainly be supported.
- Select a tape size (128KB recommended size extension), then press Enter.
- Select Capacity, then press Enter.
NOTE. Standard table proportions are indicated. You must resize in one position, but this is not supported.
- Select “Create Volume” and press Enter.
- Also select Exit, then press Enter.
- Place most of the recovery CD first and restart your entire computer.
- Follow the instructions on the screen to reinstall the operating system and supplied software.
-
How do you set up a raid on a Vaio?
Restart your computer, then press the new F2 key on the VAIO home screen. At the BIOS setup utility screen, press the right arrow key until the Advanced tab is clearly highlighted. Press the appropriate down arrow until the RAID configuration is underlined and then press Enter.
A a place to find solutions and ask questions
How do I get rid of RAID in BIOS?
Disable the RAID function in your system BIOS. Use the built-in arrows on your computer keyboard to scroll up the list and highlight a procedure in the RAID configuration menu. Select Disable and press the End key on your keyboard. Then press the Esc key to return to the main menu. Exit BIOS.
How do I get my hard drive out of RAID?
Turn on the computer.Use any up or down arrow key to select Delete RAID Volume.Use the down or down arrow keys to select the RAID volume.Press the Delete key to delete the volume.Press Y to confirm the deletion.
How do I set my BIOS to RAID mode?
Press F2 at startup to enter BIOS setup.Use one of the following methods to enable RAID, depending on your plank floor model. Go to Configuration> SA DrivesTA ”and set“ SATA Chipset Mode ”to“ RAID ”.Press F10 to save and exit.
How do I get rid of RAID in BIOS?
Disable the RAID function in the system BIOS. Use the directional arrows to locate your computer keyboard, scroll through the directory options and highlight that option in the RAID configuration menu. Select Disable and press Enter on your keyboard. Then press the “esc” key to return to the main menu. Exit BIOS.
How do I get my hard drive out of RAID?
Turn the computer over.Use the up and down arrow keys to select the “Delete RAID” volume.Use the up or down arrow keys to select the RAID volume.Click Remove to remove your own volume.Press Y to confirm the deletion.